
To ride, fly, sail, everything is there at MHD!


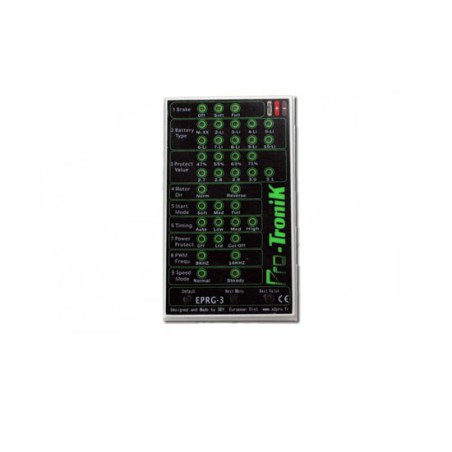
The Protronik E-PRG-3 programming card is the perfect tool to precisely adjust your brushless controllers. Specially designed for Protronik ESCs, it allows you to easily configure all key parameters: battery type, cut-off voltage, brake activation, rotation direction of Protronik motors, timing adjustment, and more.
Easy to use and highly practical, this Protronik programming card is essential to get the best performance from your controllers and ensure optimal operation of your Protronik motors.
Including €0.05 for ecotax

Electric motor radio controlled card E-PRG-3
Plus de detailsElectric motor radio controlled card E-PRG-3
The Protronik E-PRG-3 programming card is the essential tool to precisely configure your brushless controllers from the brand, except for the BF-32 series.
Designed to be simple and intuitive, it allows you to adjust many key settings: battery type selection, cut-off voltage, brake activation, rotation direction of Protronik motors, timing adjustment, and much more.
The Protronik E-PRG-3 card is powered directly by the connected controller via the propulsion battery, so no additional power supply is required.
This system works with both BEC-equipped controllers (PM10A, PM20A, PM30A, PM40A) and those without BEC (PM60A, PM70A, PM80A OPTO and PM120A OPTO).
Brake: Off / Medium / On (default: Off)
Battery type: NiXX / LiPo 2 to 8S
Low voltage cut-off: 47 / 55 / 63 / 71 % (NiXX) or 2.7 / 2.8 / 2.9 / 3.0 / 3.1 V (LiPo)
Motor cut-off: Off / Power reduction / Hard cut-off (default: power reduction)
Rotation direction: Normal / Reverse (default: Normal)
Start-up: Soft / Medium / Normal (default: Medium)
Timing: Auto / Low / Medium / High (default: Auto)
Switching frequency: 8 / 16 kHz (default: 8 kHz)
The detailed manual is supplied with the programming card, but here is a quick summary to guide you.
Connect the servo lead of your ESC to the programming connector on the card, respecting the wire color code (see manual). For PM60A, PM70A, and PM80A OPTO controllers, also connect the shorter second servo lead.
Connect the battery to the controller, making sure to respect the polarity.
After a few seconds, a beep confirms that communication between the Protronik card and the controller is established. You can then:
Check programming status: red LEDs display the current settings.
Modify settings: LEDs indicate the selected values for each parameter.
Select the parameter to change with the NEXT / MENU button (the LED blinks).
Change the value using NEXT / VALUE.
Save and go to the next parameter by pressing NEXT / MENU again.
Repeat the process until all settings are configured.
Finally, disconnect the battery.
Customers who bought this product also bought:


